Tuesday, February 26, 2013

Homemade Lemonade with Tennessee Honey


I've never been the biggest fan of whiskey, but then again, I guess I'd never had Jack Daniel's Tennessee Honey before either.


The best way to drink Tennessee Honey is with lemonade, the flavors meld together so well, it's almost like drinking liquid sunshine. It also feels decidedly Southern, which I kinda always like. And since I didn't have any lemonade on hand but I did have a whole bag of lemons, I made myself some lemonade.

Turns out homemade lemonade really is better than anything else. If you haven't ever made it before, I highly recommend trying it sometime.


Homemade Lemonade with Tennessee Honey
(lemonade recipe from Paula Deen)


1 cup of freshly squeezed lemon juice
1 cup sugar
1 cup warm water
4 cups cold water
Jack Daniel's Tennessee Honey whiskey


In a large pitcher, stir together the sugar and warm water until the sugar has completely dissolved. Pour in the lemon juice and the cold water and stir to combine.

Fill a glass with ice. Fill 1/3 of the glass with Tennessee Honey and the other 2/3 with lemonade. 

Monday, February 25, 2013

Chocolate Malt Cupcakes


Out in California, we've got these little diners called Mel's and they have the best malts on the planet. Many an afternoon has been past by me and my leading man, riding our bikes over to Mel's, drinking shakes, and picking songs from the jukeboxes they have at every table.


It wasn't until we'd likely spent a fortune on frozen treats that I realized malt powder was sold at the grocery store (duh, right) and that the secret to Mel's malts wasn't any special ice cream or devices, but rather just an abundance of malt powder. Turns out I like my malts malty.


I also happened to love malt balls, no surprise there. I'm not the biggest fan of whoppers. I prefer those absurdly huge and awesomely delicious malt balls you find in candy stores. Lately I'd even considered trying to make my own, but the recipe that kept coming up was one that consisted entirely of white chocolate and malt powder, which isn't exactly what I imagine when it comes to malt balls.


But that recipe did give me an idea. What if I used that combination of white chocolate and malt powder to make a ganache filling for a cupcake? A chocolatey cupcake... Now I was interested.


Thus these babies were born. Chocolate on the outside, malty goodness on the inside.


Chocolate Malt Cupcakes
yields about 20 cupcakes
(adapted from Hershey's)


Cupcake Batter

1 cup sugar
3/4 cups plus 2 tablespoons all purpose flour
1/4 cup plus 2 tablespoons cocoa powder
3/4 teaspoon baking powder
3/4 teaspoon baking soda
1/2 teaspoon salt
3 tablespoons malt powder
1 egg
1/2 cup milk
1/4 cup vegetable oil
1 teaspoon vanilla extract
1/2 boiling water 


Heat oven to 350 degrees. Line a cupcake pan with cupcake liners. (I doubled up on liners because mine were very thin and the batter is runny, though this is optional.)

Combine all ingredients except the boiling water in the bowl of an electric mixer. Beat on medium speed for two minutes.

Pour in the boiling water slowly and stir to combine. The batter will be very thin.

Pour batter into prepared cupcake pan, 2/3 full. Bake 18-20 minutes or until a toothpick inserted into the center comes out dry. Cool completely.


Whipped White Chocolate Malt Ganache Filling

2 oz white chocolate
1/4 cup heavy whipping cream
3 tablespoons malt powder
1 teaspoon vanilla extract


In a small saucepan, heat heavy whipping cream over medium-high heat until it starts to bubble around the edges.

In a large bowl, break the chocolate into pieces and measure out the malt powder on top. Pour the hot cream over the chocolate and malt powder and let sit a few moments before stirring until completely mixed.

Cool to room temperature before whipping or...

In a bowl larger than the bowl filled with warm ganache, pour an inch or two of cold water and add a few ice cubes. Set the bowl of ganache in the ice bath and, using and electric mixer, whip until ganache is light and airy and keeps it's shape. Whip in the vanilla extract.

Spoon ganache into a piping bag fitted with a Bismarck tip and pipe a small amount of ganache into the center of eat cupcake.


Whipped Bittersweet Chocolate Ganache Frosting

4 oz bittersweet chocolate
1/2 cup heavy cream


In a small saucepan, heat the heavy cream over medium-high heat until it begins to bubble around the edges.

In another bowl, break the chocolate into pieces. Pour the heated cream over the chocolate and allow to sit a few minutes before stirring.

Cool to room temperature or using the ice bath method described above, whip the ganache until light, airy, and it keeps it's shape.

Spoon into a piping bag and decorate filled cupcakes.

Garnish with malt balls, if so desired.

Saturday, February 23, 2013

Lemon Meringue Pie for Two


Lemon meringue is my leading man's favorite type of pie. It has everything to do with the texture. Fruit lumps, he likes to tell me, just get in the way of enjoying a pie. If every pie had a smooth gelatinous center, he'd like other pies just as much.

Personally I think he's crazy, but I suppose that's because I like pie in pretty much every size, shape and texture.


I've never made a lemon meringue pie before. Cherry is really more my bag, but since I have a sack of lemons in the fridge that I'm trying to use up, I figured I could try cooking up his favorite pie.

I didn't expect to be so lucky on my first shot, but man, this thing was good. So good it's already gone. As usual, I didn't want to make a whole flippin' 9 inch pie so I scaled it down to a size I figured wouldn't damage our diets.


Lemon Meringue Pie for Two
(recipe adapted from allrecipes.com)
  

1 half of a store bought (or homemade) pie crust
1/2 cup sugar
1 tablespoon all purpose flour
1 1/2 tablespoons cornstarch
1/8 teaspoon salt
3/4 cup milk
1/3 cup fresh squeezed lemon juice and the zest of one lemon
yellow food coloring (optional but I like my custard to be yellow yellow)
1 tablespoon butter
2 eggs, seperated into yokes and whites
3 tablespoons sugar
1/2 teaspoon vanilla extract


Pie Crust Prep

Preheat oven to 450 degrees.

Roll out the pie crust and lay into a greased 14 oz ramekin (or divide in two and lay in two 6 oz ramekins, though you might have a little extra custard). It doesn't have to be amazingly neat, but gently push the crust until it forms to all the edges. Using a fork, poke holes on the bottom of the crust and the sides. Bake in the oven for 10 minutes or until it begins to brown. Take out and set aside.

Drop the oven to 350 degrees.

Custard Prep

In a large saucepan, whisk together the 1/2 cup sugar, flour, cornstarch, salt, milk, lemon juice, zest, and a drop or two of yellow food coloring. Whisk over medium heat until the mixture begins to bubble.

Stir in the butter

Spoon a small amount of the hot sugar mixture into the egg yolks, beating vigorously. Repeat adding a small amount of hot to cold, going slowly to make sure the eggs don't scramble. Once about 1/2 cup of the hot mixture has been added to the egg yolks, pour the egg mixture back into the pot, stirring constantly. Cook until thickened and remove from heat.

Meringue Prep

In a metal or glass bowl, whisk the egg whites with an electic mixer until foamy. Gradually add the sugar and beat until stiff peaks form. Whip in the vanilla extract until thoroughly combined.

Putting it all together

Pour the custard into the blind baked pie shell. Gently spoon the meringue on top, spreading it all the way to the crust, sealing the custard in.

Place in the 350 degree oven for 10 minutes or until the meringue browns at it's edges.

Cool for at least an hour on the counter. Place in the fridge uncovered for the first three hours and after that, cover it gently with foil, being wary not to crush the meringue.

Creamy Laughing Cow Pasta with Prosciutto


For a while now, I've been pretty hooked on Laughing Cow cheese wedges. I'm not sure if it's because they taste delicious, that they're portable enough to take to school, or if there's something about them that strikes me as cute, but I've had a package of them in my fridge every week for the last two months.

Generally I eat them with crackers as a light meal or a snack, but I've recently begun to wonder whether there was something else I could do with them. That's when I saw that they could be used to make a creamy alfredo-like sauce.

For a meal that is less that 350 calories, it's amazing. Using whole grain pasta, I feel totally stuffed after munching down on this pasta. I added the prosciutto for a meaty touch and I think it really helped round out the meal.


Creamy Laughing Cow Pasta with Prosciutto
Serves two


4 oz whole grain pasta
4 wedges of your favorite Laughing Cow (I used Mozzarella, Sun Dried Tomato and Basil)
1/2 cup whole milk
1 clove of garlic
3 slices prosciutto, cut into small pieces and crisped up in the oven


Cook pasta according to package directions and drain. 

In a small saucepan, combine cheese wedges, milk, and garlic over medium-high heat. Whisk until thickened, about five minutes.

Pour the pasta into the sauce and stir to coat. Sprinkle with prosciutto and grated cheese.


Thursday, February 21, 2013

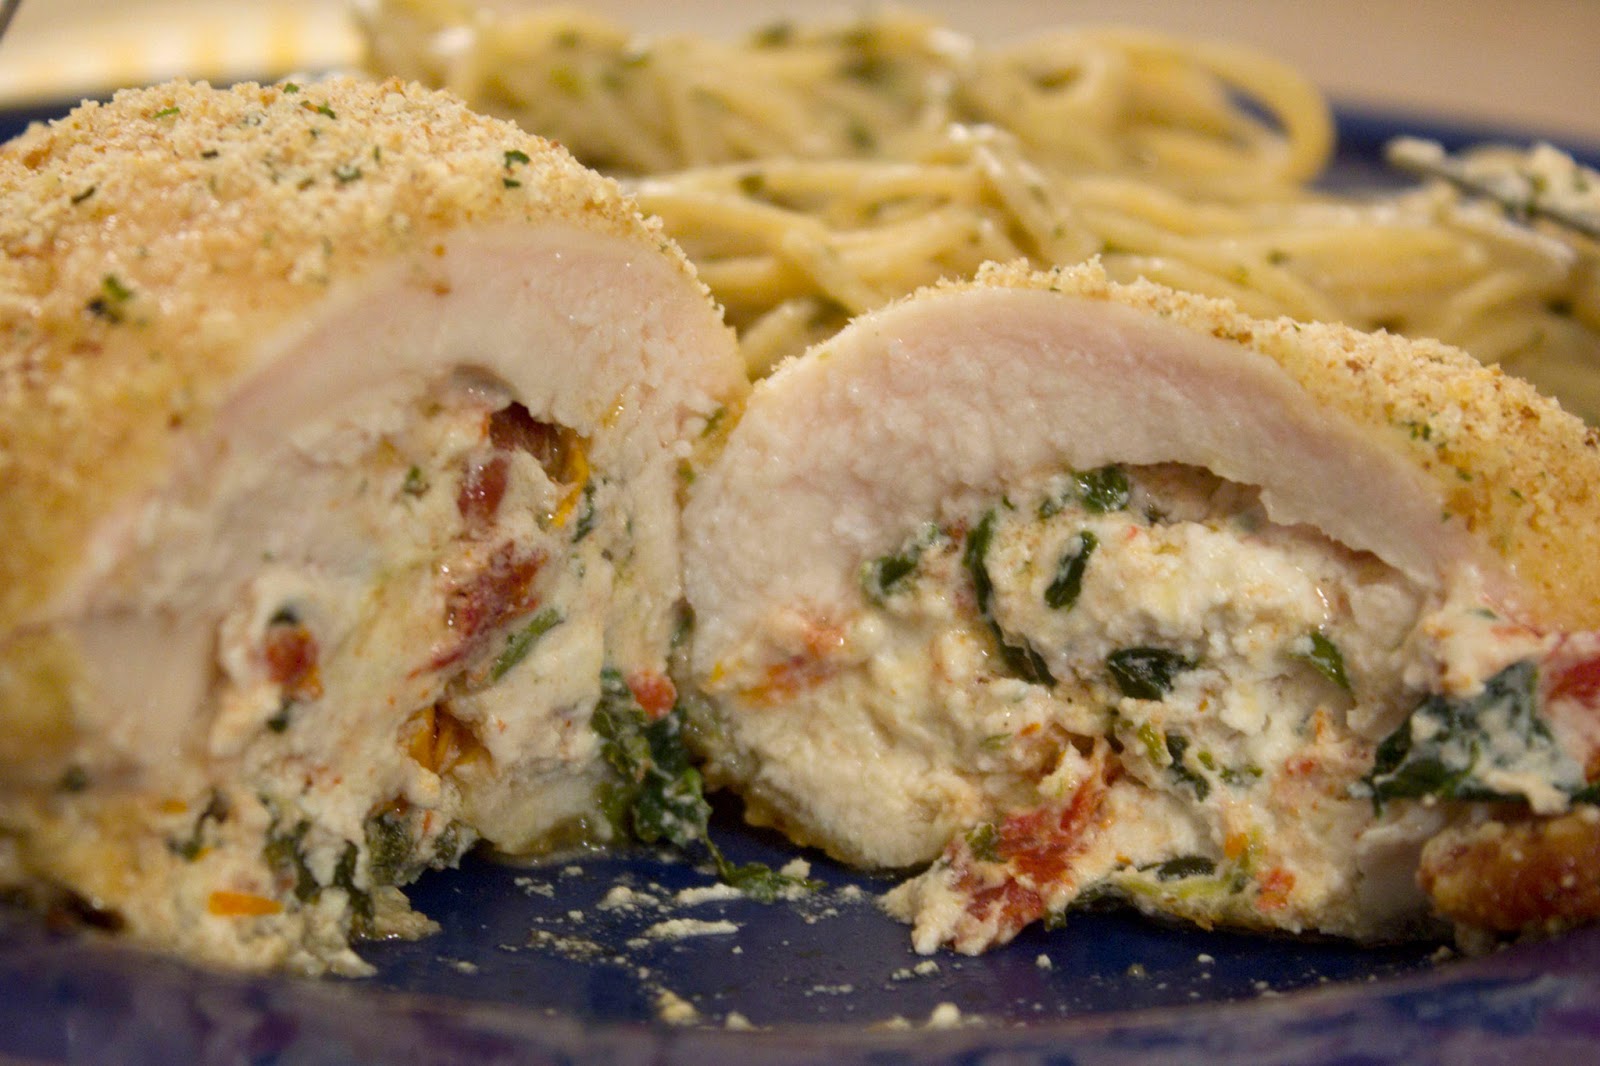
Spinach, Sun Dried Tomato and Goat Cheese Stuffed Chicken


The realization that you could stuff delicious things inside a chicken breast has completely changed my life.

I never get sick of experimenting with all the different options, but let me tell you, this combination is one of my all time favorites.


As a huge fan of goat cheese, I'm always looking for ways to sneak it into every meal, and I've gotta say, it goes outrageously well with chicken. Mix in a little sun dried tomato and spinach and you've got yourself a filling fit for a king.


Spinach, Sun Dried Tomato and Goat Cheese Stuffed Chicken
Serves two


2 skinless chicken breasts
1/4 cup Italian seasoned bread crumbs
1/4 cup grated Parmesan
1/2 teaspoon salt
1 egg
1/4 cup goat cheese
2 tablespoons spinach
2 sun dried tomatos packed in oil, diced
1/4 teaspoon fresh ground black pepper


Preheat oven to 375 degrees. Spray an 8x8 baking sheet with olive oil non-stick spray.

Between two sheets of plastic wrap, pound the chicken breasts until no less than 1/8 inch thickness, starting in the thickest areas and working your way out.

In one bowl, lightly beat the egg. In another, combine the bread crumbs, Parmesan, and salt. In yet another bowl, stir together the goat cheese, spinach, sun dried tomatos and pepper.

Lay the chicken breast out flat. Spoon half the cheese mixture evenly across the surface, leaving an inch bare at the top of the breast. Starting from the bottom, roll the chicken, folding the cheese mixture inside.

Dip the rolled breast in the egg mixture and coat with breadcrumbs, laying the breaded chicken seam side down into the prepared pan. Repeat with the remaining breast.

Spritz the top of the breast with a small hit of olive oil non-stick spray and bake in the oven for 30 minutes or until chicken is done.

Tuesday, February 19, 2013

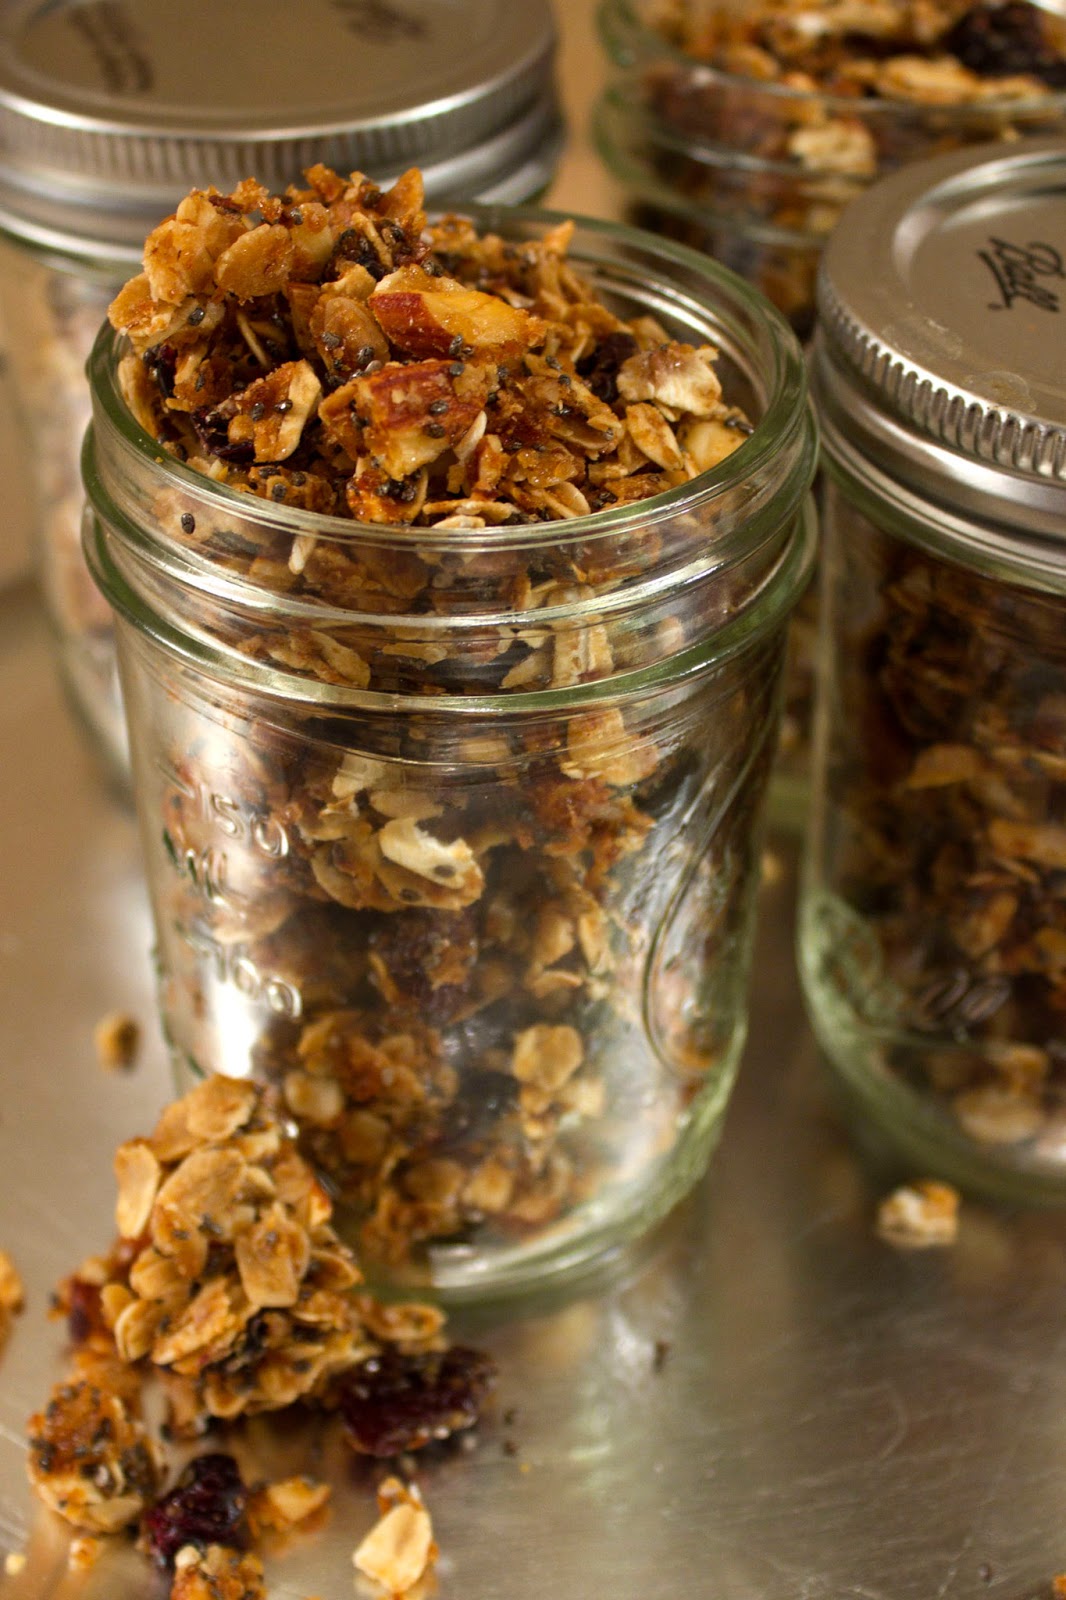
Fruit Nut and Chia Granola


Ever since I found out about Chia Seeds, I've been trying to find ways to incorporate them into my diet in a natural and tasty way. I've tried Chia Seed puddings and overnight oatmeals, and while they both were pretty delicious, they didn't seem like the kind of foods I could eat on a regular basis. 

But one day, while watching the Power Trip episode of Good Eats, I had a thought. I eat fiber bars just about every day for breakfast. If I made my own, I could include a healthy serving of Chia and fulfill at least that personal dietary goal.

I decided to try out making Alton Brown's granola bars, subbing the sunflower seeds for chia seeds, since I'm not a big fan of their crunchy shells. 

As bars, they weren't quite a success, but as granola, it tasted delicious. It didn't exactly stick together the way I had hoped it would but this form is even more diverse. I've had it sprinkled on top of yogurt and it is awesome. I also like to munch on it plain. 


Fruit Nut and Chia Granola
makes 8 servings
(adapted from Good Eats)


1 cup old-fashioned rolled oats
1/4 cup chia seeds
1/2 cup sliced or chopped almonds
1/4 wheat germ
1/4 cup honey
2 tablespoons brown sugar
1 tablespoon butter
1 teaspoon vanilla extract
1/4 tsp kosher salt
1/2 cup dried cherries
1/2 cup dried blueberries


Preheat the oven to 350 degrees. Grease an 8x13 baking pan.

Spread the oats, chia seeds, almonds and wheat germ out on a cookie sheet. Toast in the oven for 10 minutes, stirring every five minutes.

Drop the temperature of the oven to 300 degrees. In a small saucepan, heat the honey, sugar, butter, extract, and salt over medium heat until the brown sugar has completely dissolved, stirring with a heat resistant rubber spatula.

Pour the toasted dry ingredients into the 8x13 baking pan with the hot sugar mixture and the dried fruits. Using the spatula, stir all of the ingredients together until no dryness remains. Bake in the oven for 25 minutes, stirring halfway through.

When the 25 minutes is up, pull out of the oven and cool completely on the pan. Package into airtight containers. It should keep for up to a week on the counter.

Monday, February 18, 2013

Apricot Brie Grilled Cheese


As I expressed with my Brie and Apricot Jam Tartlette, the flavor combination of sweet jam and creamy brie is divine. Particularly apricot jam. I'm usually not much for the taste of apricots, but it compliments brie like nothing I've ever tasted.

I'm not sure why it took me so long to realize, but now it seems obvious to me. Put the two together in a sandwich. Toast it up until the cheese is nice and melty and you've got my new favorite go-to meal. I'm already looking forward to the next time I get to eat it.

As always, I used my panini press to cook up these little sandwiches but you could just as easily use a non-stick skillet and grill it up the old fashioned way.


Apricot Brie Grilled Cheese
makes two sandwiches


4 slices whole grain white bread
3 tablespoons apricot jam
4 oz brie, cut into long slices
butter


Heat panini press.

Lightly butter one side of each slice of bread. Spread apricot jam on the dry side of two slices and lay the brie on top. Close the sandwich with the buttered sides out.

Lay in the panini press and cook for 3-5 minutes or until golden brown and melty.
  

Saturday, February 16, 2013

Pecan Macarons with Maple Buttercream


Macarons have skyrocketed in popularity lately and it's for good reason. They are so so  good. 

Of course it helps that they are ridiculously adorable. I mean look at them. They are cute little sandwiches! And as an added bonus, they are incredibly diverse; as far as flavorings go, they are as unlimited as your imagination.


The only thing is, macarons are impressively finicky. I've been making pistachio macarons for years now and being completely honest, some batches still occasionally turn out looking like hatched dinosaur eggs, even though I prepared them in no discernibly different way.

Even still, these things are just so damn good, I can't be deterred. They are the kind of cookie that vanishes as parties, that everybody marvels at, and that even the most ardent sweet haters can't resist. 


Nowadays, I have a few tricks up my sleeve when it comes to baking macarons that I'll share below. Hopefully with these little shortcuts, you can whip up a batch of tasty macarons too.


Pecan Macarons with Maple Buttercream 
Yeilds about 20 sandwiches 
(recipe adapted from Martha Stewart)


1 cup sifted powdered sugar
3/4 cup pecan flour*
2 aged egg whites, room temperature**
Pinch of cream of tartar
1/4 cup granulated sugar
Maple Buttercream (recipe below)


Lay parchment paper down on two large cookie sheets.

With the whisk attachment of and electric mixer, whisk eggs until foamy. Add the cream of tartar and beat until soft peaks form. Add the granulated sugar and beat until stiff peaks form. You'll know you are there when the white keep their shape.

With a spatula, fold in the powdered sugar and the pecan flour until combined. Transfer to a piping bag and and pipe disks about 1 1/2 inches in diameter. Once you've piped all the batter, tap the cookie sheet against the counter or table to shake loose any trapped air bubbles.

Preheat the oven to 375 degrees.

Allow the piped cookies to sit at room temperature for half an hour while a skin to forms. This is what makes the feet of the macarons.

Once the 30 minutes are up, place one sheet into the oven and reduce the temperature to 325 degrees. Bake for 10-12 minutes, rotating the pan halfway through. They are done baking when they are crisp and firm.

Return the oven temperature to 375 before baking the next sheet. Be sure to lower the temperature back to 325 once the cookies go in.

Allow the cookies to cool on the pan then transfer to a cooling rack. Once all the cookies are done, match them up in pairs by their size to prepare for the filling.


*For the ground pecan flour, You'll need about a cup and a half of chopped pecans. Pour the pecans into a food processor and pulse 3 seconds at a time until the nuts look finely ground. Be careful of pulsing too long or the oil in the nuts will turn everything to paste.

Once the pecans are finely ground, sift the pecan flour. Measure out 3/4 cup and reserve any extra, including the thicker pieces that don't get sifted for the buttercream.

**This step isn't required but I find it greatly helps in the success of the final product. For best results, you need to prepare these a few days before, but even a few hours helps.

To age them, place the two egg whites in a small container, I used a mason jar. Lay plastic wrap over the top, sealing tight, and poke a bunch of holes with a toothpick to allow air flow. Place in the fridge for a few hours to up to a few days. This process removes excess water and helps the white beat into stiff peaks.


Maple Buttercream


1/4 cup butter (1/2 stick), softened
1/4 cup powdered sugar 
1 1/2 tablespoons maple syrup
1/4 leftover ground pecans (optional)


In a bowl, beat together all ingredients until fully combined. Spread a scant 1/2-1 tablespoon buttercream onto the flat side of a macaron and sandwich with its pair. 

Macarons are best served the day they are filled but will keep for a few days in the refrigerator.


Friday, February 15, 2013

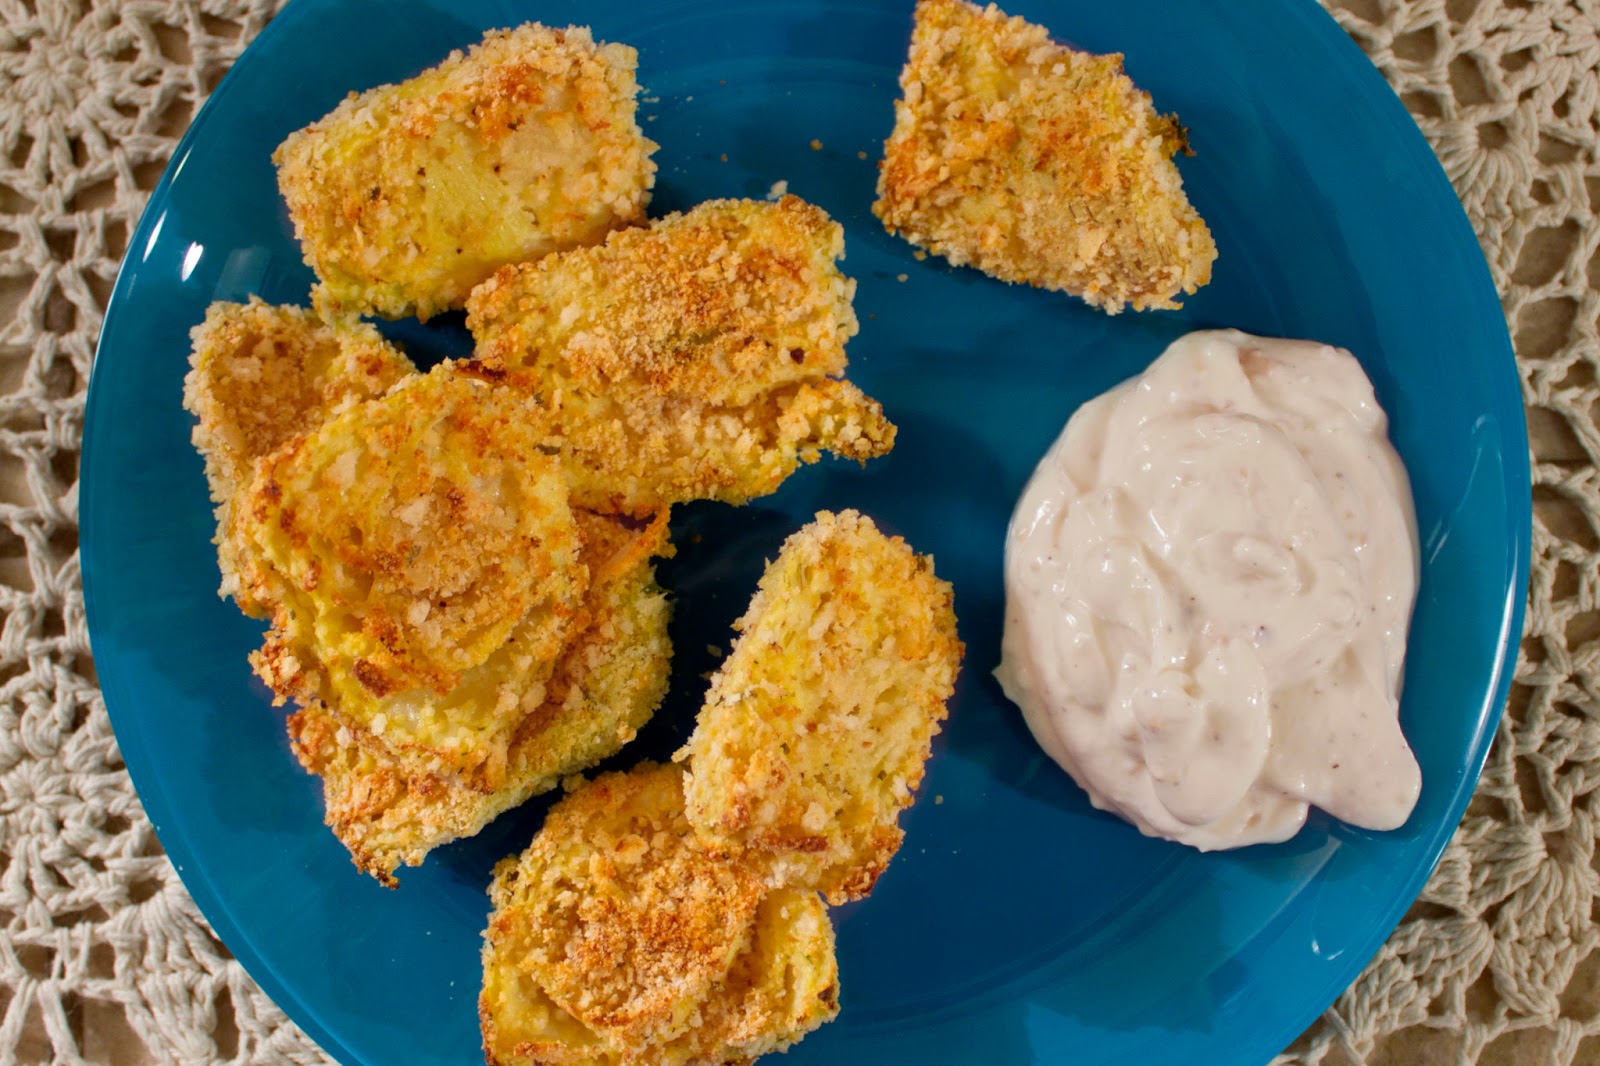
Breaded Artichoke Hearts


Stuffed artichokes are one of my absolute favorite vegetables, but preparing then at home is such a hassle. Sure I'll make 'em every once in a while, when I want to be impressive or when I have a lot of time, but it isn't really a practical way to consume vegetables. Besides, they are so much work to eat and the majority of what's filling you up is breading.


That's where these guys come in. Using canned artichoke hearts not only means you can eat the whole thing, it means you can eat them anytime you want, no matter what season.

Plus they work as a nice little finger food. I served mine with a lightened up garlic goat cheese sauce that added a nice bit of tang. I've included the recipe below, but feel free to use any sauce you like. These things are so good I can't imagine what they wouldn't go with.


Baked Artichoke Hearts
Serves two
(recipe barely adapted from eat, live, run)


1 can whole artichoke hearts
1 egg
1/8 cup Italian seasoned breadcrumbs
1/8 cup Panko breadcrumbs
1/8 cup grated Parmesan cheese
salt and pepper


Preheat oven to 375 degrees. Line a baking sheet with parchment paper.

Thoroughly drain the artichokes, gently squeezing as much excess liquid from each heart. Slice each heart in half and set aside.

In a small bowl, lightly beat the egg. In another bowl, combine the breadcrumbs, Panko, cheese, and salt a pepper.

One at a time, dip each half artichoke heart into the egg, then into the breadcrumb mixture, pressing to insure full coverage. Lay breaded artichoke onto the prepared baking sheet and repeat with the rest of the hearts.

Bake in the over for 15 minutes, flip the artichokes, and bake another 15 minutes. 

Serve with a side of dipping sauce.


Lightened up Garlic Goat Cheese Dipping Sauce


1/4 cup Greek Yogurt
I clove of garlic, minced
1/8 cup crumbled goat cheese
salt and pepper to taste


In a small bowl, combine all ingredients with a spoon, gently mashing the goat cheese into the yogurt.

Allow to sit at room temperature while the artichokes bake so the flavors can mingle.